Why auto scaling?
Auto Scaling Groups are a really useful and solve several of the cloud promises.
- High availability by automatically replacing unhealthy instances
- Elasticity by throwing in more instances when more horsepower is required
These are the two major selling points of Auto Scaling Groups and that is pretty good stuff, but there is more that they can do for you. Together with CloudFormation we can automate our deployment and even perform seamless rolling updates. This opens new doors! Need to deploy a new version of your application or maybe apply security patches? Just replace the instances. Amazon even patches the standard AMIs for you. Is an instance misbehaving? Just terminate it and the Auto Scaling Group will start up a new one for you. Treat your servers as cattle rather than pets. Sounds good? Let’s look at how this is done.
Building blocks
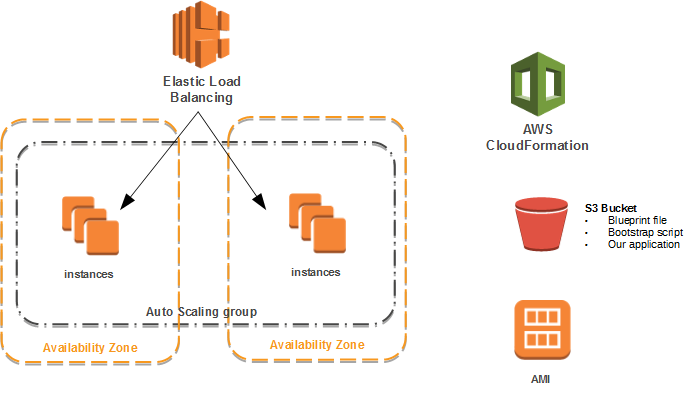
The key component here is the Auto Scaling Group containing the EC2 instances. They sit in two different Availability Zones with an Elastic Load Balancer on top distributing the traffic between them. We use CloudFormation to create a blueprint off our stack. We have an S3 bucket containing the blueprint, our bootstrap script and the application we want to deploy on to the servers. We use a Amazon’s Windows AMI that we put our configuration and application on during first boot.
Let’s look at some concepts that we need to understand.
Auto Scaling Group
The Auto Scaling Group, ASG, is the key component in our example. It contains information about how to scale your application, what to launch the instances from and how to perform updates.
Launch Configuration
The ASG launches new instances from a Launch Configuration. It contains information about which AMI to use, instance type, which Security Group to put them in and so on. Basically, the same information you need to provide when launching an instance manually.
Elastic Load Balancing
The ELB distributes traffic between the instances in the ASG. It also performs health checks and reports back to ASG if it finds an unhealthy instance.
CloudFormation
CloudFomarmation allows you to build blueprints of your infrastructure in JSON format. You create stacks from your templates, but you can also change your infrastructure by updating the template and performing a stack update. We will trigger a stack update to roll out configuration changes to our servers and deploy new versions of our applications.
Bootstrapping
Bootstrapping can be accomplished by passing User Data to the instances. We will pass a very simple PowerShell-script that just goes to our S3 bucket, downloads our central bootstrap script, runs it and passes a message back to CloudFormation that it has completed. Any configuration we want to make to our instances is kept in our central bootstrap script. If we want to make any changes to our servers we just update the script, trigger a stack update and CloudFormation will take care of the rest for us.
Setting this up
IAM Role
First of all, we will create an AIM role that our instances will be assigned to. This role will give the instances read access to our S3 bucket. I’m starting by creating a a policy which I’m calling S3-Read-Bootstrap. It has the following statement and, as you may notice, my bucket is called “cristian-bootstrap”.
{
    "Version": "2012-10-17",
    "Statement": [
        {
            "Effect": "Allow",
            "Action": [
                "s3:Get*",
                "s3:List*"
            ],
            "Resource": "arn:aws:s3:::cristian-bootstrap/*"
        }
    ]
}
I then create a role called “web-server-role” which I attach the policy to.

S3 bucket
I have a bucket called cristian-bootstrap and it only contains 3 files.
- bootstrap.ps1 – my central bootstrap script which installs IIS and our application
- index.html – simple web page that will act as our “application”
- web-stack.json – our Cloudformation template containing the blueprint
CloudFormation template
This is where the meat is. Here we “program” our infrastructure rather than clicking around in the console. If you haven’t used CloudFormation, I strongly recommend that you familiarize yourself with it. There are template snippets which are a good starting point. Head over to the template reference if you need details about specific resource types. You may also want to have a look at a JSON tutorial.
The file contains a section for parameters and one with resources. We are defining one parameter, a launch configuration, a load balancer and an auto scaling group.
Parameters
Here we specify which parameters we need to create our stack. It could be any input you want to pass to your template. In our case we are just taking one parameter and that is build version. The way we are going to use this parameter is to determine if there is a new version of our application we want to deploy. Let’s say that there is nothing to change on our infrastructure but we still want to deploy a new version of our application. This is how we tell CloudFormation that. The parameter is called BuildNumber, of type string an if nothing is specified it will default to “0.1”.
{
  "Parameters": {
    "BuildNumber": {
      "Type": "String",
      "Default": "0.1",
      "Description": "Number of the build being deployed"
  }
},
Next are the resources. Let’s have a look at them one by one.
Launch Configuration
First we are saying that this resource is called LaunchConfig and that it is if type Launch Configuration. We are then specifying the properties like, AMI, instance type, key pair security group and IAM Role (remember the one we created in the beginning?). We also have the user data which may look a little bit funny but makes more sense when we see past the formatting.
"LaunchConfig": {
  "Type": "AWS::AutoScaling::LaunchConfiguration",
  "Properties": {
    "ImageId": "ami-9ebb39ed",
    "InstanceType": "t2.micro",
    "KeyName": "cristian-ew-key",
    "IamInstanceProfile": "web-server-role",
    "SecurityGroups": [ "sg-60ef3904" ],
    "UserData": {
      "Fn::Base64": {
        "Fn::Join": [
          "",
          [
            "<powershell>\n",
            "New-Item -Path C:\\Bootstrap -ItemType directory\n",
            "Copy-S3Object -BucketName cristian-bootstrap -Key bootstrap.ps1 -LocalFile C:\\Bootstrap\\bootstrap.ps1\n",
            "C:\\Bootstrap\\bootstrap.ps1\n",
            "cfn-signal.exe -e 0 --stack ", { "Ref" : "AWS::StackName" }, " --resource AutoScalingGroup --region ", { "Ref" : "AWS::Region" }, "\n",
            "# ", { "Ref": "BuildNumber" }, "\n",
            "</powershell>"
          ]
        ]
      }
    }
  }
},
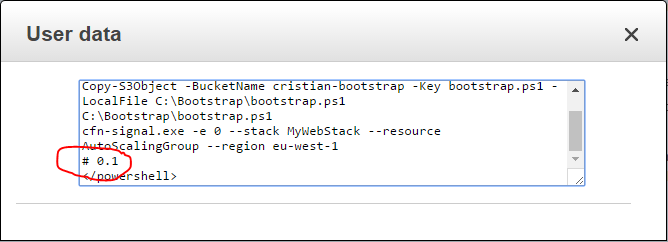
Bellow you see what the User Data will look like. First we are telling it that this is a PowerShell script. We start by creating a directory called C:\Bootstrap. The next line copies bootstrap.ps1, our central bootstrap script, to the newly created folder from our S3 bucket. We then run the bootstrap script we just downloaded. Once it completes, we send a signal to CloudFormation letting it know. More about this signal later.
<powershell>
New-Item -Path C:\Bootstrap -ItemType directory
Copy-S3Object -BucketName cristian-bootstrap -Key bootstrap.ps1 -LocalFile C:\Bootstrap\bootstrap.ps1
C:\Bootstrap\bootstrap.ps1
cfn-signal.exe -e 0 --stack MyWindowsStack --resource AutoScalingGroup --region eu-west-1
# 0.1
</powershell>
Elastic Load Balancer
Next comes our ELB configuration. It tells CloudFormation to create a loadbalancer and specifies that standard stuff you need to specify whenever to create a load balancer, like which security group, subnets, that it is internet facing, what port to listen on, what port to talk to the instances on and what health check to run. I would normally use SSL offload in the ELB, but in this case we are skipping this for simplicity.
"LoadBalancer": {
  "Type": "AWS::ElasticLoadBalancing::LoadBalancer",
  "Properties": {
    "SecurityGroups": [ "sg-60ef3904" ],
    "Scheme" : "internet-facing",
    "Subnets": [ "subnet-dd2eb784", "subnet-63f7a906" ],
    "Listeners": [
      {
        "InstancePort": "80",
        "InstanceProtocol": "HTTP",
        "LoadBalancerPort": "80",
        "Protocol": "HTTP"
      }
    ],
    "HealthCheck": {
      "Target": "HTTP:80/index.html",
      "Timeout": "5",
      "Interval": "30",
      "UnhealthyThreshold": "2",
      "HealthyThreshold": "2"
    }
  }
},
Auto Scaling Group
Lastly we create the ASG. We tell it which AZs to use, which launch configuration to launch instances from, minimum number of instances and maximum number of instances we want running. We also tell it that instances should register with the load balancer we created above. The HealthCheckType and HealthCheckGracePeriod are important properties. Default health check type is EC2 meaning that the ASG will only look at the EC2 health to determine its health, basically is the server up? That is not good enough as we want to make sure that our application is actually responding as expected so we tell the ASG to use ELB health check instead. The grace period is how long the ASG should give the instance to start up before checking its health. We are bootstraping the machines so we need to give them a little bit of time. This value is important. If it is too short ASG will believe instances are broken even before they have completed the bootstrap process. I once set this far too low, went for lunch and forgot about it. Next day I discovered my ASG had been bringing up hundreds of instances, believing they were broken and throwing them away. Remember that minimum charge for an instance is 1 hour, right?
The creation policy tells CloudFormation that it should wait for the instances to signal completion and wait for our bootstrap process to complete. That is what the cfn-signal does in our User Data. Since we want 2 instances before we consider us up and running we set the count to “2”. We also tell it to wait for up to 30 minutes for this signal to come.
The update policy says that we want to use rolling updates. If we make a change to our instances we want them replaced one by one but do not continue with the next until you have received an ok signal.
"AutoScalingGroup": {
  "Type": "AWS::AutoScaling::AutoScalingGroup",
  "Properties": {
    "AvailabilityZones": [ "eu-west-1a", "eu-west-1b" ],
    "LaunchConfigurationName": { "Ref": "LaunchConfig" },
    "MinSize": "2",
    "MaxSize": "4",
    "HealthCheckType": "ELB",
    "HealthCheckGracePeriod": "1800",
    "LoadBalancerNames": [ { "Ref": "LoadBalancer" } ]
  },
  "UpdatePolicy": {
    "AutoScalingRollingUpdate": {
      "MinInstancesInService": "1",
      "MaxBatchSize": "1",
      "WaitOnResourceSignals": "true",
      "PauseTime": "PT30M"
    }
  },
  "CreationPolicy": {
    "ResourceSignal": {
      "Count": "2",
      "Timeout": "PT30M"
    }
  }
}
Our application
For simplicity, our application is represented by a single html-file. The important thing here is to understand that we are deploying our application from our bootstrap script and that our application package is sitting in our S3 bucket. In a real world scenario this probably means that you have your build system dropping the application packages to an S3 bucket. You could then specify a parameter in your CloudFormation file to tell it which application to install. You could also tell it which environment this is (dev/test/prod) and have your bootstrap script pull down environment specific configuration files. Anyway, in this example it’s just a file called index.html.
Create your stack
Let’s see this in action. Go into CloudFormation in the AWS Console and choose to create a new stack. Specify the URL to your CloudFormation template and click next.

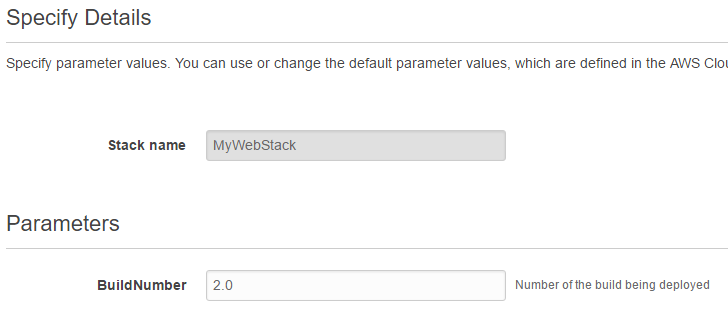
You will be asked to give your stack a name and specify any parameters that you are requesting in your CloudFormation template.Remember that we had a build number in ours? I’m calling my stack “MyWebStack” and just leaving the default build number.
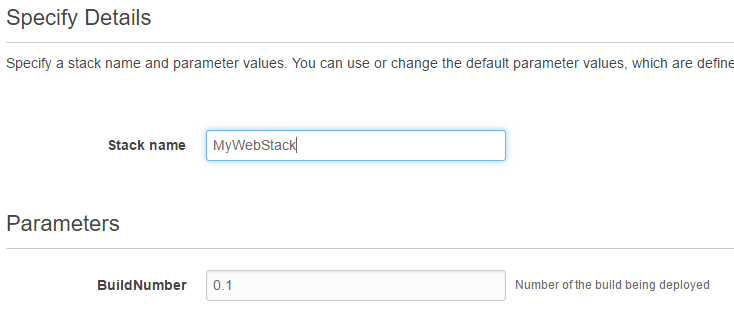
On the next screen you can give your resources tags. Tags can be really useful for finding stuff quickly but also allows you to group costs by tags. This way you can see how much a specific application is costing or how much you different teams spends on infrastructure. You can also set permissions based on tags. You could give developers access to dev environments or Windows admins to Windows servers only. Anyway, we are not using tags in this example so just skip to the next page, review and create your stack.
It will take a few minutes, 7 in this example, so stretch your legs or something. Bellow is an example of how the log looks like. As you see we are receiving success signals from our instances. These are the ones we are sending once the bootstrap completes.

If you want to know which resources it created you can click the Resources tab.

We will of course also find the resources in the AWS console. Here is our Auto Scaling Group.

The Launch Configuration…

The Load Balancer. Here is where we see the DNS name that our ELB was assigned. I would recommend using Route 53 to have prettier DNS names.

And finally our EC2 instances.

If we point our browser to the ELB adress we should see our application.
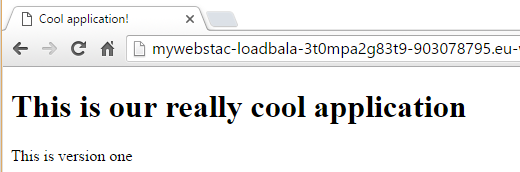
Yes, it’s working. Let’s see what we can do with this.
Recover from failures
To simulate a failure, I’m jumping on to one of the machines and stopping the web server.

It doesn’t take long before the ASG reacts by terminating my failed instance and firing up a new one.

Few minutes later and we are back where we want to be with 2 operational machines.

Updating your stack
Since we did enable rolling updates in our ASG, we can seamlessly replace instances. If we for example want to switch from t2.micro to t2.small you just need to update your CloudFormation template and do an update stack and it will all be taken care of for you. But how about new versions of our application or configuration changes to the servers that we do using our central bootstrap script? That’s where the build number parameter comes in. If you didn’t notice, we insert the build number into the User Data as a script comment. It’s not doing anything, but if we update the build number, Cloud Formation will see a change to the launch configuration and do a rolling update. That’s how we will be deploying!
Let’s pretend that we have a new build of our application in the S3 bucket waiting to be deployed. I’ll kickoff a stack update. Go into CloudFormation, only this time chose Update stack instead and specify the same CloudFormation template. Next yo will see the screen where you can specify the parameters. I’m updating my build number to “2” and then I kick off the update.
You will see one instance at the time being replace.

A while later your servers will have been replaced with new fresh ones.

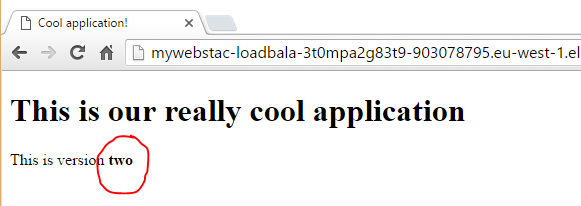
Let’s test our application. I’m pointing my browser to the ELB address and we see that our application has been updated.
Considerations
There are a few things to consider when working with this set up.
You need to handle any sessions outside of the servers. If you for example have users login in to your application that sessions needs to be handled outside of the servers, DynamoDB could be a good choice. Otherwise your users will be loged out whenever they hit another server. Any files uploaded need to be saved outside the servers, example S3. Since your servers will be replaced quite frequently, you should push out the logs, example to CloudWatch. Think “my server can be replace any minute – what does this mean for my application?”.
Small instances might take long time to bootstrap depending on what you do during your bootstrap process. You may reach a point where you need to start baking custom AMIs to speed things up. You don’t need to go all the way with complete AMIs but maybe the basic stuff in the AMI and leaving the application deployment for the bootstrap. Going from T2 to other types of instances, example M4 can speed up things significantly but then to a higher cost. It’s all a trade off in the end.
In a Windows world it is quite common to join your servers to an Active Directory. This will slow down your bootstrap process even more. You may also have things you can only do after the mandatory reboot when joining a domain, example specifying domain accounts for your applications pools. This means that you must be able to continue your bootstrap process even after a reboot. I will cover that in an upcoming article.
T2 instances uses CPU credits meaning that they can only peak CPU for certain amount of time and then simply given less CPU time. If you are using scale out policies based on CPU this could potentially be a problem. You can read more about CPU credits here. The nice thing about T2 is that they are so inexpensive but in the end you get what you pay for.
